Kichler 15313 Instrukcja Użytkownika

Przeglądaj online lub pobierz Instrukcja Użytkownika dla Oświetlenie Kichler 15313. Kichler 15313 User Manual Instrukcja obsługi

  • Pobierz
  • Dodaj do moich podręczników
  • Drukuj
  • Strona
    / 2
  • Spis treści
  • BOOKMARKI
  • Oceniono. / 5. Na podstawie oceny klientów
Przeglądanie stron 0
SAFETY INSTRUCTIONS
READ THIS FIRST
KEEP THESE INSTRUCTIONS
This xture is intended for installation in accordance with the National
Electric Code (NEC) and Local code specications. Failure to adhere to
these codes and instructions may result in serious injury and/or property
damage and will void the warranty.
1) WARNING: This xture is not to be installed within 10 feet (3M) of a pool,
spa or fountain.
2) This xture is to be used only with a power unit (transformer) rated a maximum
of 300 W (25 AMPS) 15 volts.
3) The #18 ga. xture wire is not intended for direct burial.
4) Direct burial rated wire is to be buried a minimum of 6” (152mm) beneath
the surface of the ground.
NOTE: If additional Direct Burial wire is needed, contact your local
Kichler
®
landscape distributor.
• 8 GA wire can be purchased in length of 250’ (76 M), 15503-BK.
• 10 GA wire can be purchased in length of 250’ (76 M), 15504-BK.
• 12 GA wire can be purchased in lengths of 100’ (30 M), 15501-BK; 250’
(76 M), 15502-BK; 500’ (152M), 15505-BK; and 1000’ (304 M), 15506-BK.
5) Fixture shall not use a tungsten halogen lamp unless the xture is marked
for use with such lamps.
6) Wiring connections must be made with approved/listed wire connection
device(s) suitable for the application. Do not exceed manufacturers’ wiring
combination specications for size and quantity of conductors.
ASSEMBLY AND INSTALLATION
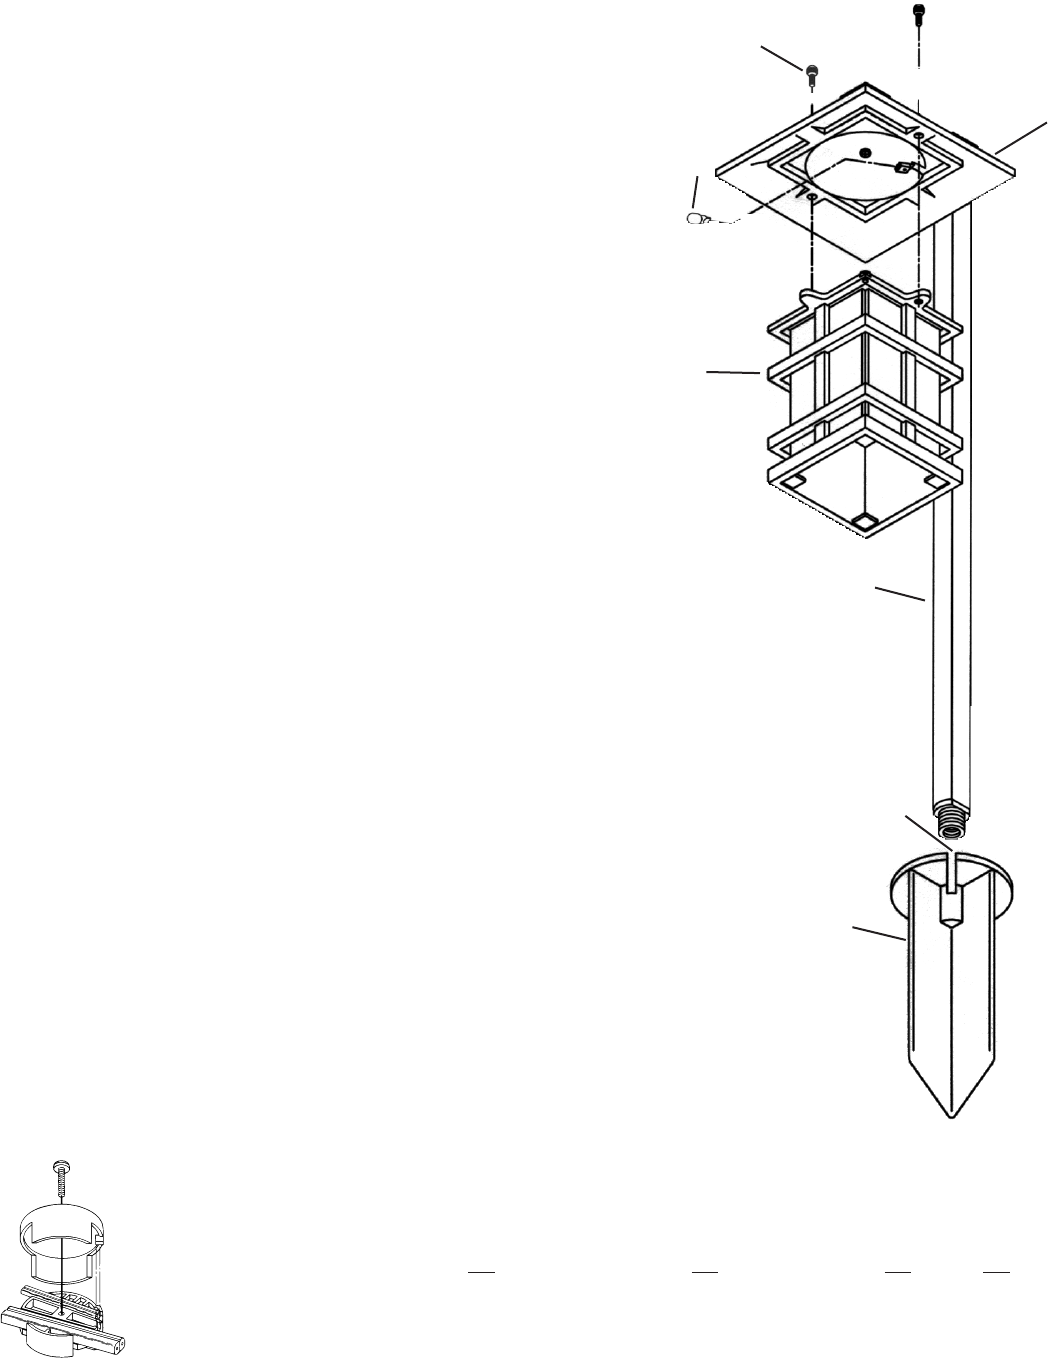
1) Determine desired location for mounting xture.
2) At desired location, hammer stake (A) into ground. To avoid damage to
stake, place a board on top of stake while hammering. If ground is hard
and stake is difcult to install, make a crosscut in ground using a at
shovel.
3) Clear away area in ground at wireway slot (B) in top of stake (A).
4) Lay 12V cable into wireway slot (B) and screw stem (D) into stake (A). If
assembly does not look straight, adjust by pushing or pulling on stake only.
5) Loosen thumbscrews (C) and remove shade (G).
6) Install provided lamp (F) to socket inside xture head (E).
7) Re-assemble shade (G) to xture head (E) and tighten thumbscrews (C).
8) TURN OFF POWER.
9) Make wire connections using supplied Quic Disc
™
following instructions
below, or using other approved wiring connection method (not supplied.)
Date Issued: 12/2/11 IS-15313-US
A
B
F
C
FIXTURE HEADS MAY VARY DUE TO INDIVIDUAL DESIGNS.
E
G
D
For warranty information please visit: http://www.landscapelighting.com/portal/warranty_page
Para informacion de la garantia por favor visite: www.landscapelighting.com/portal/warranty_page
QUIC DISC
™
WIRING INSTRUCTIONS
Turn off power.
The full length of the 18 GA xture wire may be used to connect with the 10 GA or 12 GA cable provided the following conditions are met:
• Wiring is to be protected by routing close to the xture or accessory or secured to a building structure such as house or deck.
• 18 GA xture wiring is to be cut off so that it is attached to the connector within 6 inches of the xture or building structure.
• If it is necessary to make the connections underground, then no more than 6 inches of the 18 GA xture wire is to be buried.
The Quic Disc
™
connector is designed to install one xture and accommodates one 18 GA xture wire and one 10 GA or one 12 GA supply wire.
Place the 10 gauge supply wire across the area marked 10 GA on Quic Disc
™
or place the 12 gauge supply wire across the area marked 12 GA
on Quic Disc
™
.
Place the 18 gauge xture wire across the area marked 18 GA on the Quic Disc
™
. After the wires are in place, connect the top of the Quic Disc
™
to the base with supplied screw, making sure that the wires remain at in the bottom portion of the Quic Disc™, and the screw is tightened all
the way down.
The copper contacts will automatically pierce the wires’ insulation. Excess 18 GA xture wire that sticks out the end of the Quic Disc
™
is to be cut off.
Make no other wiring connections to the 18 GA xture wire.
Przeglądanie stron 0
1 2

Podsumowanie treści

Strona 1 - KEEP THESE INSTRUCTIONS

SAFETY INSTRUCTIONSREAD THIS FIRSTKEEP THESE INSTRUCTIONSThis xture is intended for installation in accordance with the National Electric Code (NEC)

Strona 2

INSTRUCCIONES DE SEGURIDADPrimero lea estoGuarde estas instruccionesEste artefacto se debe instalar de acuerdo con el Código Eléctrico Nacional (NEC,

Komentarze do niniejszej Instrukcji

Brak uwag

Sterling Plumbing Bath and Wall Surrounds 6103 Series manuales

Manuales del propietario y guías del usuario para Cocina Sterling Plumbing Bath and Wall Surrounds 6103 Series.
Ofrecemos 1 manuales en pdf Sterling Plumbing Bath and Wall Surrounds 6103 Series para descargar gratis por tipos de documentos: Manual de usuario


Más productos y manuales para Cocina Sterling Plumbing

Modelos Tipo de documento
71101122 Manual de usuario   Sterling Plumbing 71101122 User Manual, 2 paginas